How To Successfully Migrate to Jira Cloud in Phases and Reduce the Risk of Data Loss

|
Meta Information |
|
Explanation |
|---|---|---|
|
metaDescription |
Migrating to Jira Cloud in a big bang can get complex! Learn how to simplify the process by migrating to in phases. |
Field Type Text Help Should be max 120 characters. This is shown on the result page e.g. on Google. |
|
shareTitle |
How To Successfully Migrate to Jira Cloud in Phases and Reduce the Risk of Data Loss |
Field Type Text Help This title is shown when the blog post is shared on social media. |
|
shareDescription |
Migrating to Jira Cloud in a big bang can get difficult! Learn how to simplify the process by migrating to Jira Cloud in phases. |
Field Type Text Help Should be 1-2 sentences. This text is shown if the blog post is shared on social media or other platforms. |
|
shareImage |
|
Field Type PNG/JPG |
|
teaserImage |

|
Field Type SVG Help To add an SVG do the following:
|
|
teaserText |
See how a phased migration strategy, in comparison to "big bang", could help you reduce the risk of data loss and prolonged downtimes. |
Field Type Text Help Should be 1-2 sentences. |
|
author |
Field Type Link to page Help The author needs to be a page link from the team page. |
|
|
heading |
How To Successfully Migrate to Jira Cloud in Phases and Reduce the Risk of Data Loss |
Field Type Text Help If your blog post title should change for the following reasons:
Example: The title of the blog post is -
Heading property = Announcing Orderly: Replace Confluence Page Properties with Notion-like Databases |
|
textToSpeech |
Unknown Attachment |
Field Type mp3 Help Please ping Steffen to create the file. |
|
relatedPosts |
|
|
app newsletter image (primary) |

|
|---|---|
|
app newsletter image (secondary) |

|
Cloud, cloud, cloud – it’s the talk of the town! Many Jira users are migrating from Server and Data Center (DC) to Jira Cloud. However, migrating an entire Jira instance in one go, or ‘big bang’, can be daunting due to risks of data loss and downtimes. These risks can be minimized though by opting for a phased migration strategy facilitated by Backbone Issue Sync for Jira.
In this article, you’ll learn how to easily migrate to Jira Cloud in phases and best practices on making your migration as smooth as possible. This also includes keeping your Server or DC instance in sync with Jira Cloud using Backbone Issue Sync for Jira.
What to Consider Before Migrating to Jira Cloud?

Phased Migration vs Big Bang
There are different migration paths you can take when looking to migrate to Jira Cloud, each with their own pros and cons. For instance, if you opt for the big bang migration, there’s less planning involved. On the other hand, you also run a high risk of losing data and considerable downtimes in case of any hiccups during the process. Onboarding your users all at once can also become a hassle.
In comparison, a phased migration strategy minimizes these problems as you migrate only certain parts of your Jira instance at a time. It involves breaking the migration process into smaller, more manageable phases rather than attempting a single, large-scale migration.
Keep or Delete the On-Premises Projects
Another decision required is whether to keep or delete the original on-premises project (Server and Data Center). Deleting the on-premises projects after the migration means users will not be able to find issues they’ve previously worked on. Opting to keep your on-premises projects, in combination with phased migration, facilitates a more seamless migration journey.
Practical Steps for a Migration to Jira Cloud in Phases
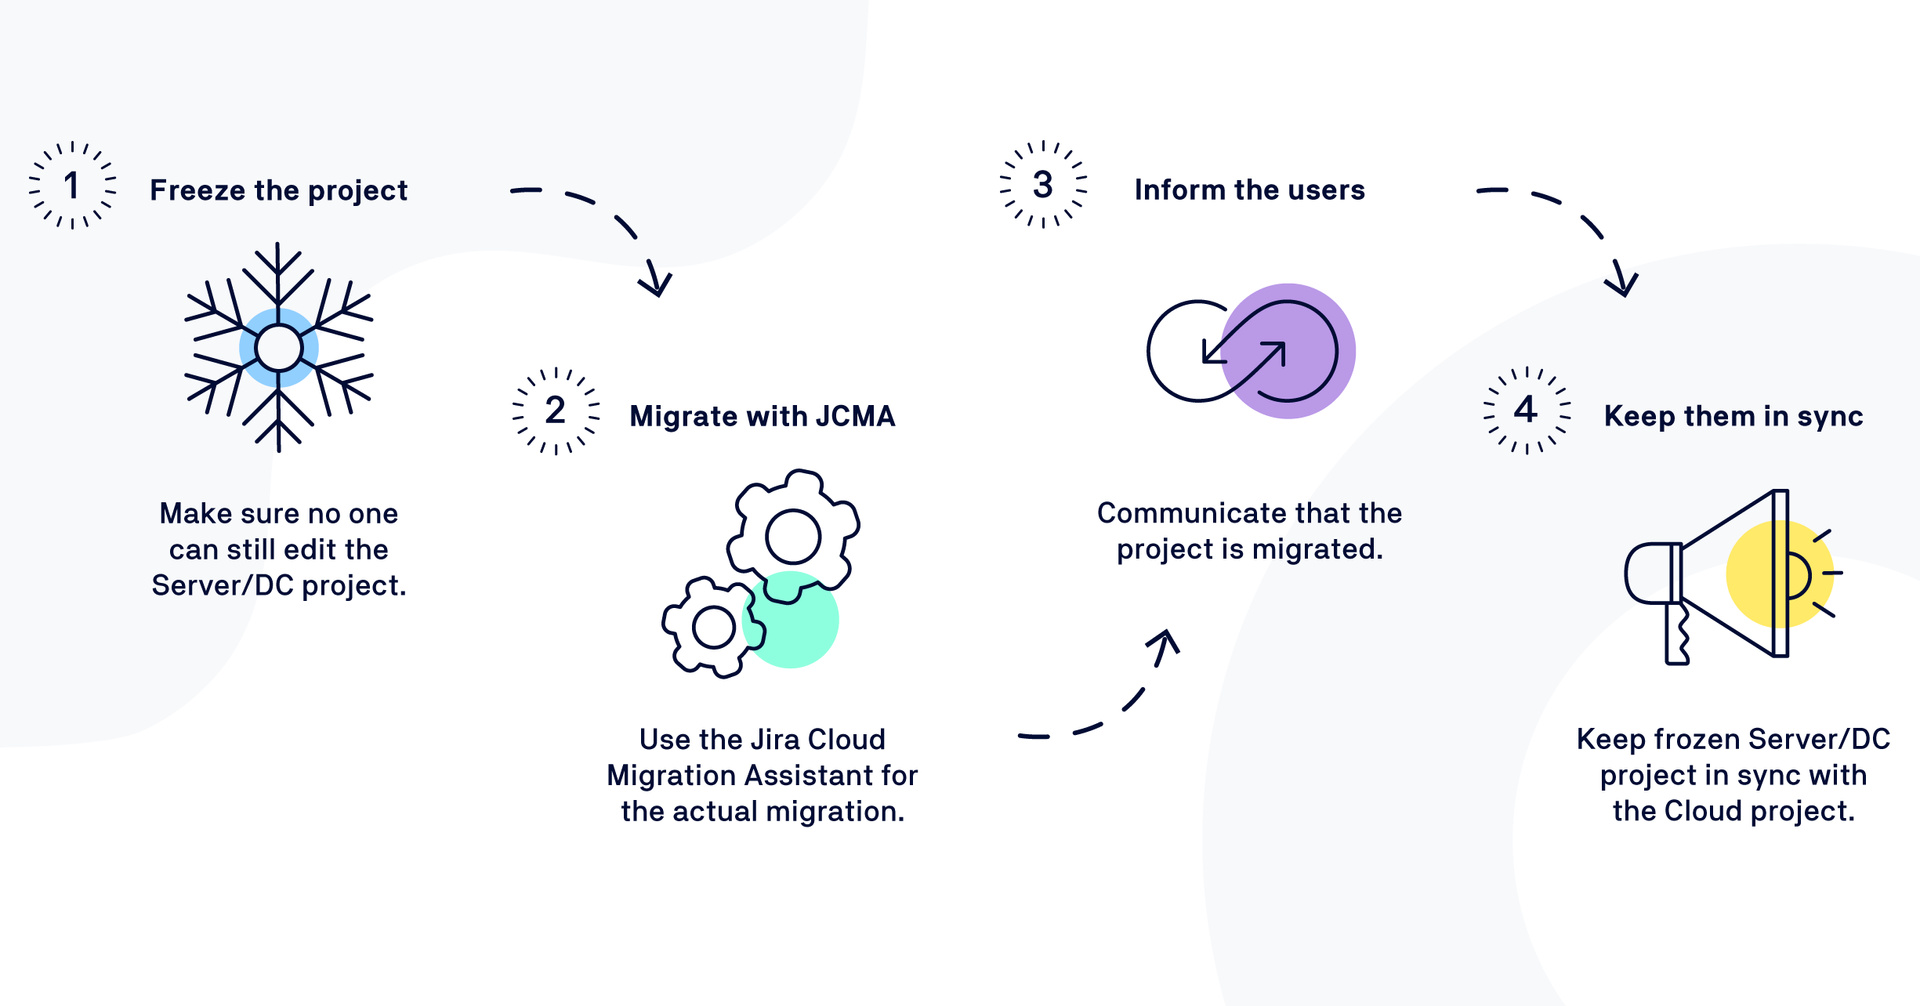
If you have opted to migrate to Jira Cloud in phases, here are some best practices to ensure a smooth journey:
-
Don’t delete your Jira Server or Data Center projects to ensure users can easily find existing Jira issues and data.
-
Freeze the projects on the Server or Data Center instance and make sure they are not editable anymore to avoid losing any updates.
-
Migrate your projects from Jira Server or Data Center to Jira Cloud using the Jira Cloud Migration Assistant.
-
Let your users know the project has been migrated and that work should now be done on the Jira Cloud instance. Ideally, you should set up a banner on that project for better visibility. You can learn more about how to set up a banner in this help article.
-
Keep the projects in sync using Backbone Issue Sync until the migration process is complete.
Keep Your On-Premises and Cloud Instances in Sync Using Backbone
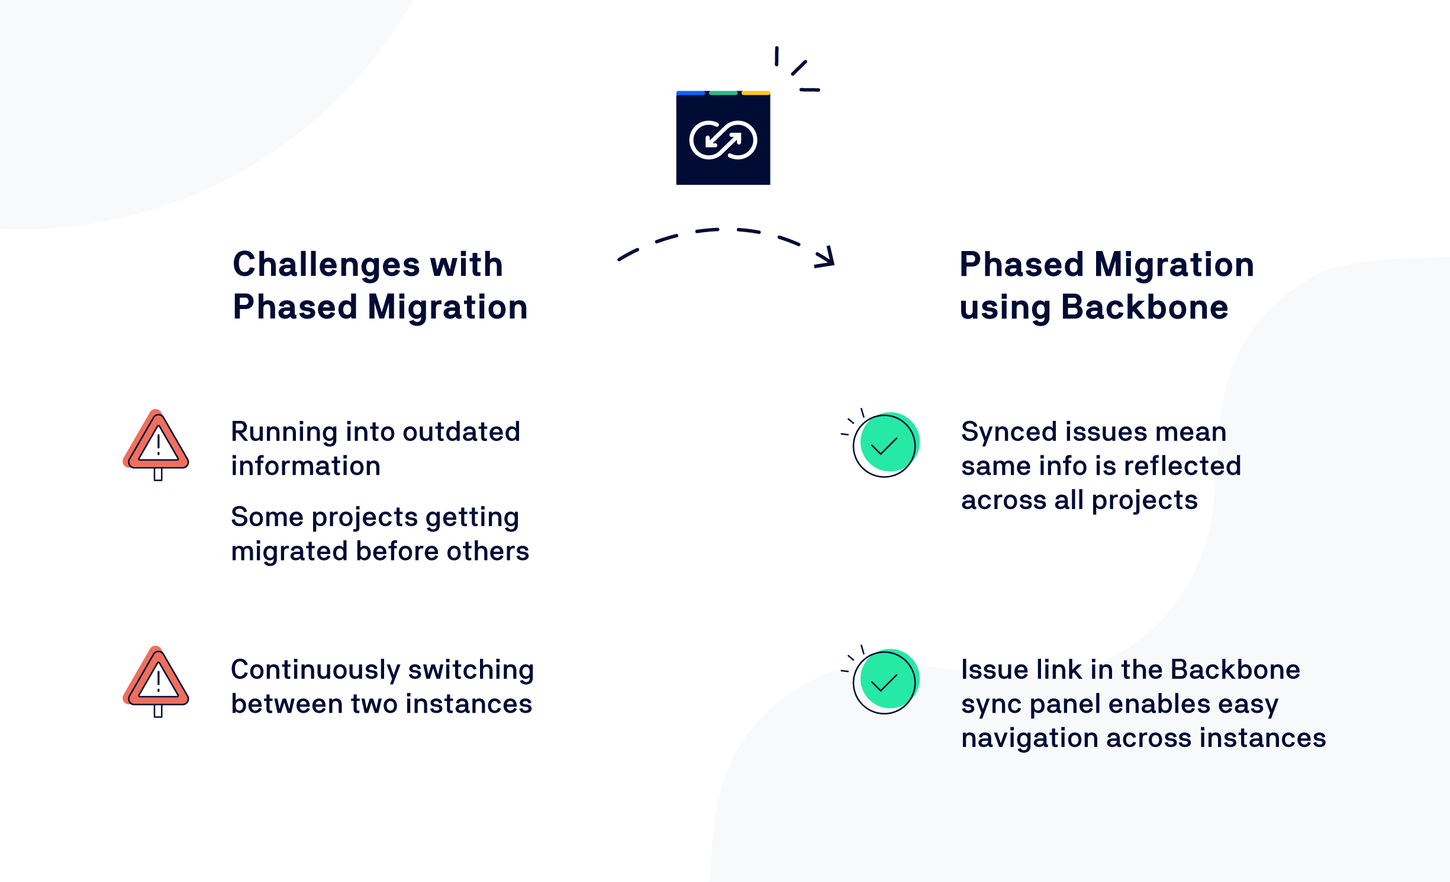
You might ask, why do I need to keep the instances in sync? There could be additional challenges if you decide to keep your on-premises project while migrating to Jira Cloud in phases.
-
Keeping the on-premises project means users might run into outdated information.
-
In this hybrid model, some projects might get migrated before others, meaning users must operate in both systems, causing confusion.
-
Users might have to switch between two instances to find the most updated Jira issues.
The risk of outdated data and misalignment between instances during phased migration can be minimized using Backbone Issue Sync for Jira.
By synchronizing with Backbone, you can keep the on-premises instance up to date with information from the Jira Cloud instance. Here’s how:
-
Install Backbone Issue Sync from the Atlassian Marketplace on both the Jira on-premises and Jira Cloud.
-
Set up a unidirectional synchronization and link the issues automatically, as described in this help article.
Backbone gives you granular control over the type of Jira data you want to sync across instances. You can pick the issue types (e.g., task, sub-task, bug), field types (e.g., description, assignee, including custom fields), workflows, comments, and attachments to sync. A quick preview of how easily and effortlessly you can set up Backbone Issue Sync is shown in the video below.
In addition, you can also easily limit the issues you want to sync using JQL-based filters (e.g., status, date created), as explained in this help article.
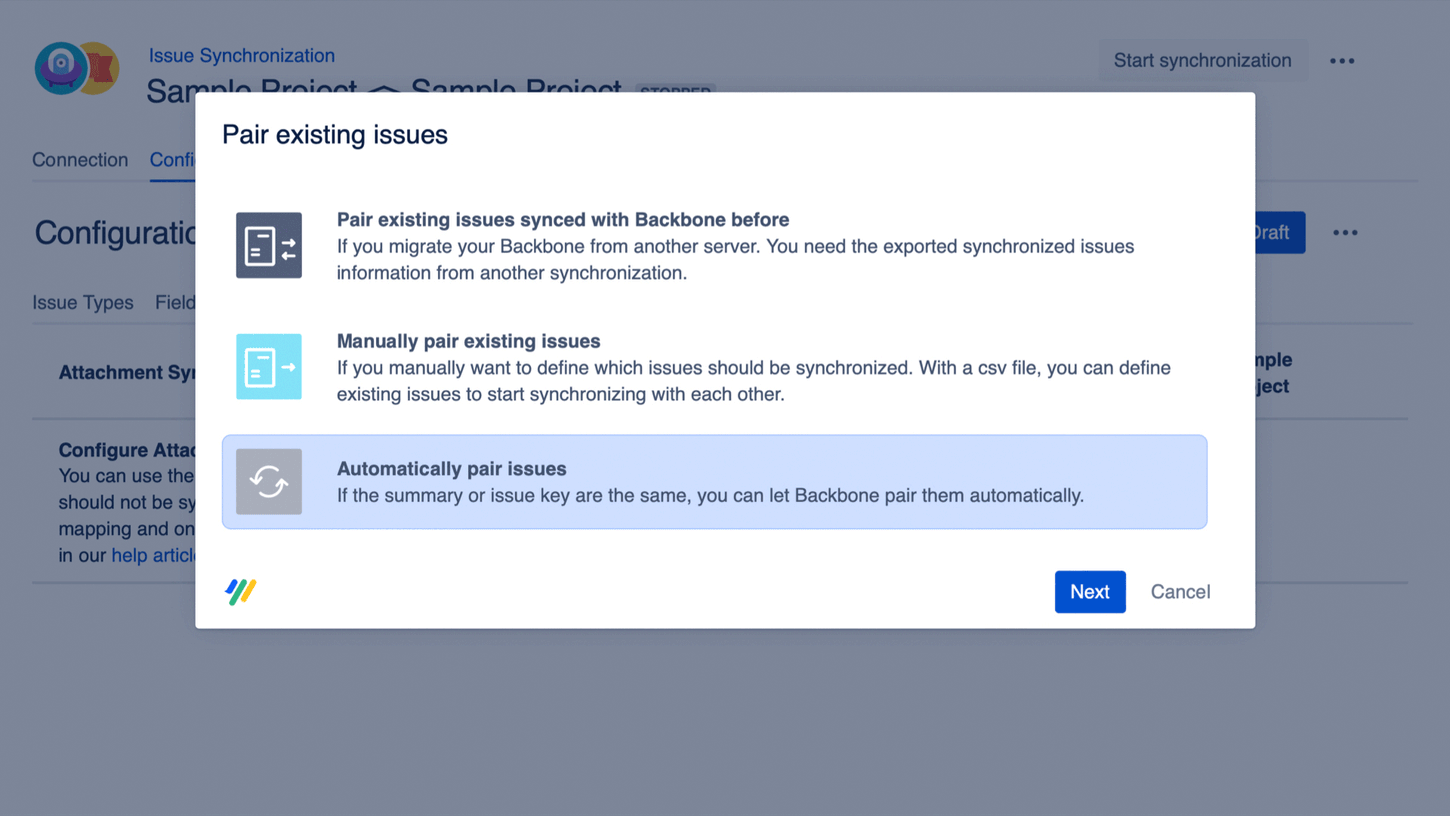
Pair Existing Issues Automatically Across Jira Instances
For the last step, Backbone can help you automatically pair the issues (original and migrated) with each other in a couple of clicks so they can remain in sync. This saves you the time and effort required to manually find the relevant issues on both instances and link them. You can learn more about the exact steps in this help article.
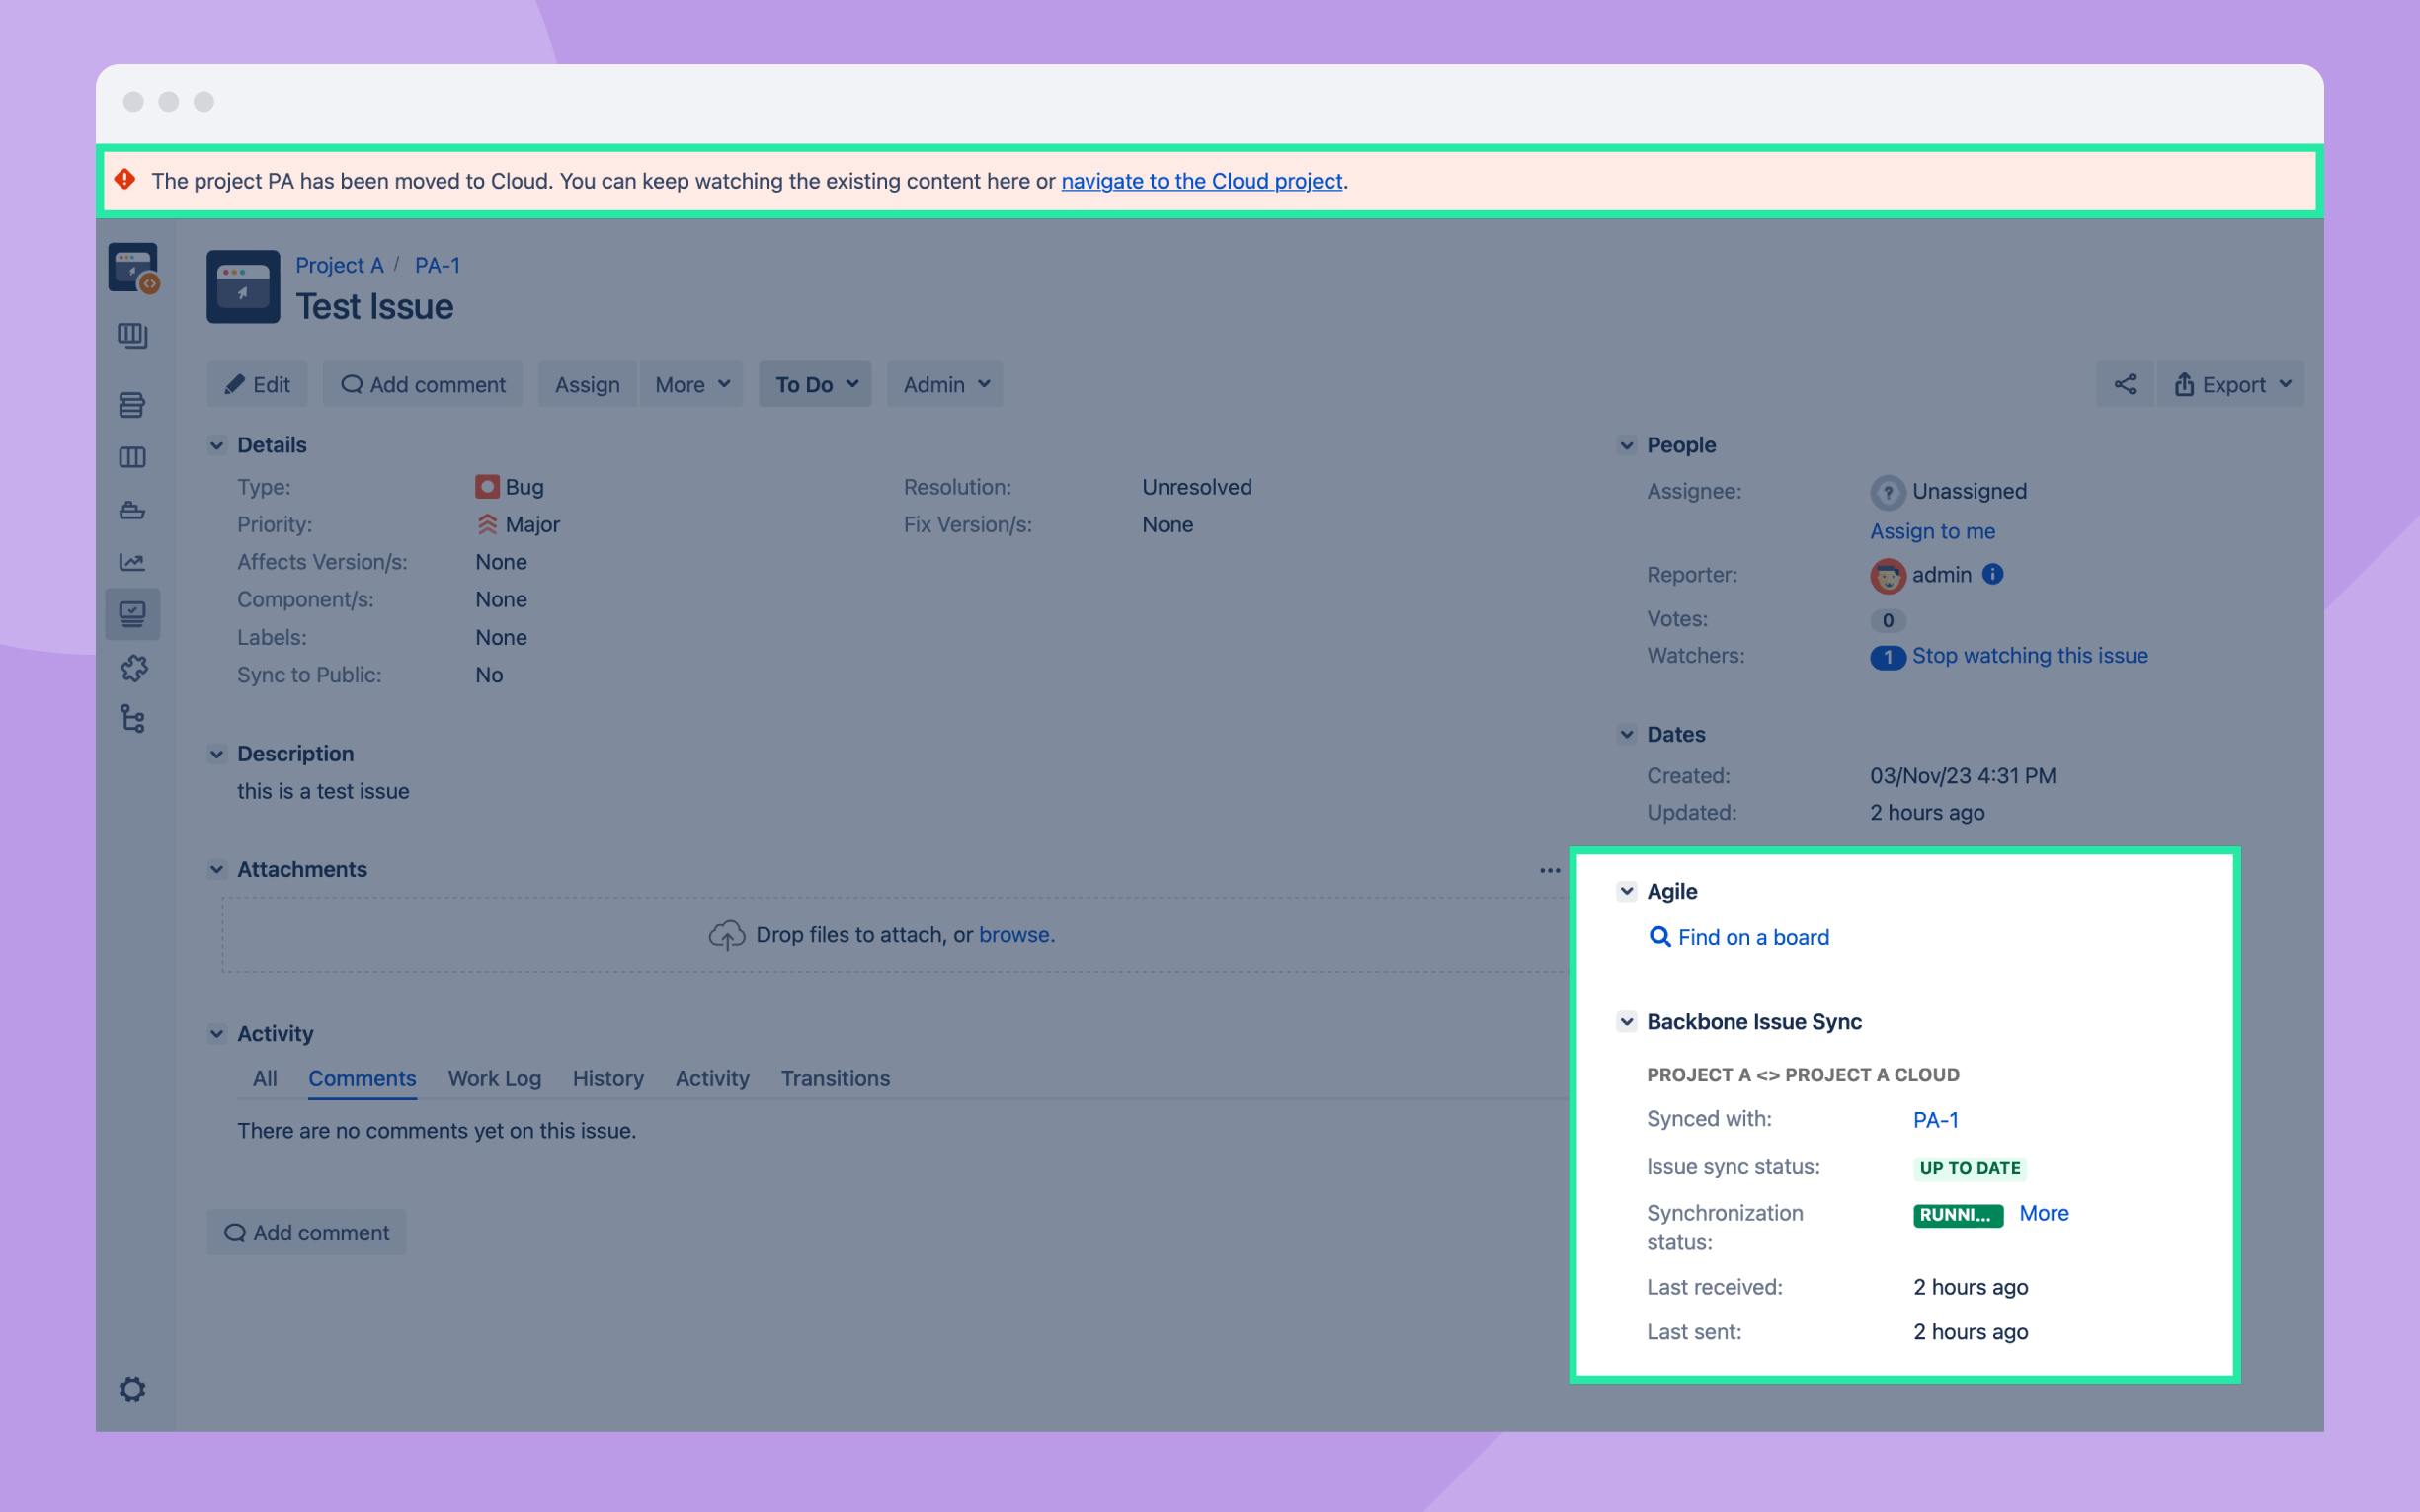
Easier Navigation Between Instances Using Backbone
Once the issues are paired, a link between new Cloud issues and existing on-premises issues will be created, making navigation between the two instances easier. This link can be accessed easily via Backbone’s issue sync panel. Clicking on the link on the on-premises Jira link, for example, takes you directly to the corresponding Jira issue on Cloud.
You can set up as many syncs as needed to keep your projects up to date. Once all projects are migrated to Jira Cloud, you can stop the syncs and clean up the old projects. Then, your migration to Jira Cloud will be complete!
Streamline Phased Migration to Jira Cloud with Backbone Issue Sync for Jira
Backbone Issue Sync for Jira facilitates your phased migration journey so you can mitigate risks of data loss and downtimes and ensures a seamless transition to Jira Cloud. Backbone will keep your instances in sync, so you can be empowered to migrate at your own pace without worry.