Let's assume you love using Confluence templates as much as my colleague Laura – our Content Marketing Manager who advises "making templates work hard so you don't have to". So of course, she tried creating a template for blog posts – only to discover that this isn't possible natively in Confluence. Fortunately, I was able to help out by coming up with a simple but useful workaround that makes Confluence blog post templates possible. Bookmarklets to the rescue!
11 years and counting
Of course, Laura wasn't the first to realize that a blog post template would make a useful addition to Confluence's collaborative functionality. 464 other people have voted to have this feature included since it first surfaced over 11 years ago. As of yet however, Atlassian has chosen not to resolve this issue.
Needless to say, people have provided some workaround solutions, such as copy-pasting content from normal Confluence pages into blog posts. Unfortunately, this can cause unwanted <span> tags to be inserted, potentially leading to unpredictable display issues when you use Confluence as your website's CMS and employ a custom website theme as we do. And anyway: copy-pasting? Isn't that what templates are made to solve?
The quest for blog post templates begins
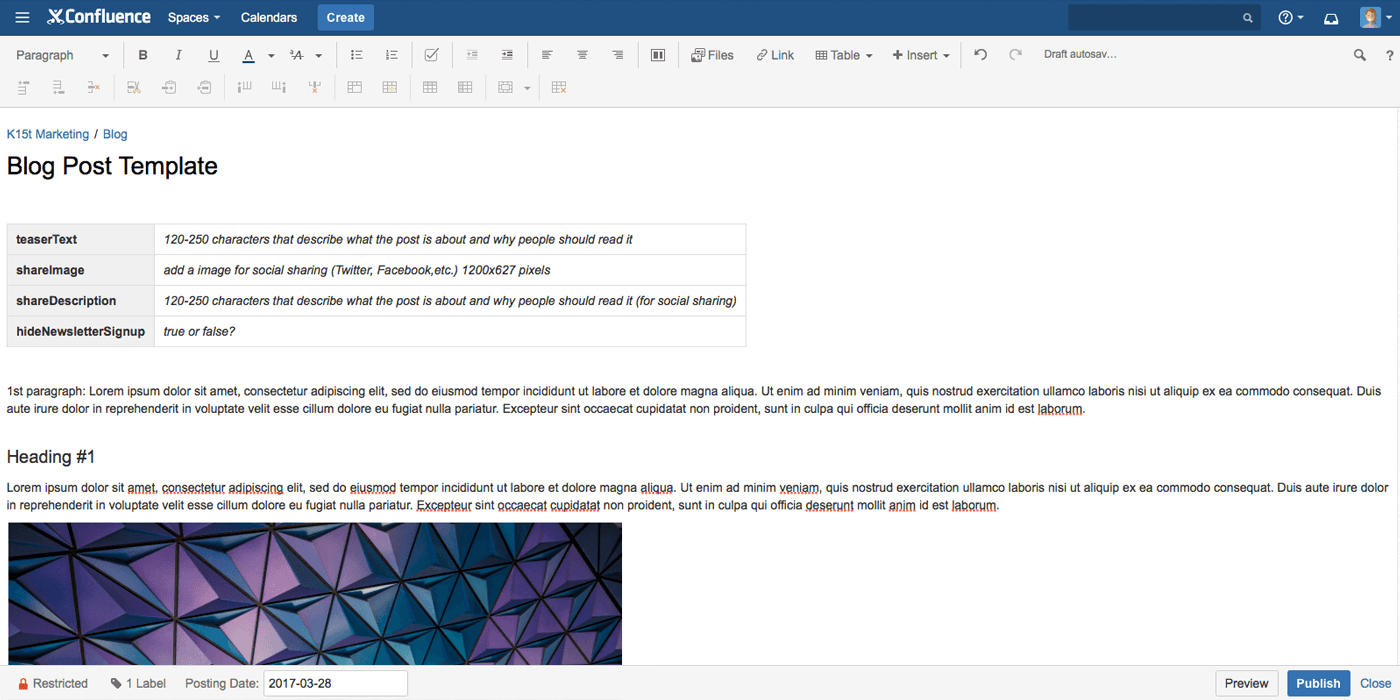
Before starting to search for a solution, you need to know what exactly you are trying to achieve. Consequently, I prompted Laura – who'd asked for my assistance in this matter – to provide me with an exact list of what the content team wanted in their blog post pages. Shortly afterwards, I received the following:
Dear Martin,
As we use Confluence blog post pages as the source of our corporate weblog, it would be grand if blog posts contained certain page properties as well as some formatted placeholder text by default. Moreover, viewing permissions should be set to restricted by default.
Doesn't sound like too much to ask, does it? Time to start the quest for implementing blog post templates in Confluence.
Thank the bookmarklet creator
Before trying to invent the wheel, it's best to check if the wheel has already been invented, and one of the best places to look for Confluence-related solutions is Atlassian's Confluence development project. After perusing approximately 100 comments on the aforementioned JIRA ticket, it became obvious no tried and true solution would present itself. I'd have to come up with an answer of my own.
I knew the solution had to be easy to use – ideally with only one click – otherwise it would be neither practical nor time-saving. Easy to say, I know. Yet just as I started thinking that this wasn't going to be a short walk in the park, it hit me: what do we use everyday that requires just one mouse click and already lives in our browser toolbars? Bookmarks – and by extension, bookmarklets! Bookmarks can contain any URL with a valid URI scheme (you might be familiar with the most well known examples, such as mailto: and ftp:). Fortunately, a URL can also contain JavaScript enabling links to trigger functions. The content team would just have to click on a bookmark and voilà, their blog post template would be inserted.
Do it yourself
Over 100 comments and 464 votes tell me that others might also benefit from my Confluence blog post template bookmark, so here is what you'll need to do to create one. (If you're not interested in the details, just skip to the bottom for a ready-to-use bookmarklet).
I chose to use a little tool that turns code into bookmarklets, encoding script and wrapping it with JavaScript.
Please keep in mind that this guide was created using the Chrome browser and should work for Confluence 6 and up – it is possible, however, that some of the following selectors differ in your installation.
To get started, open the bookmarklet creator tool in a new window or tab.
-
Paste the following code into the bookmarklet creator:
var html = `Paste your obtained HTML here!`; $('#wysiwygTextarea_ifr')[0].contentWindow.document.querySelector('#tinymce').innerHTML = html; -
In a new tab, navigate to the Confluence page you wish to serve as your blog post template, and open the editor.
-
Open the developer tools (CMD+SHIFT+I in Chrome on Mac) and type the following command into the console and hit enter:
$('#wysiwygTextarea_ifr')[0].contentWindow.document.querySelector('#tinymce').innerHTML -
Copy the HTML code contained within the quotation marks ("...").
-
Paste it in the designated space (between the apostrophes
html = `Paste your obtained HTML here!`) in the bookmarklet creator. -
Add the following code to the bookmarklet creator if you would also like the bookmarklet to automatically add viewing restrictions to your Confluence blog post. Make sure you set the correct group or user (
var restrictTo = 'confluence-users') in the first line of the code.var restrictTo = 'confluence-users'; $('#rte-button-restrictions').click(); setTimeout(function() { $('#page-permissions-names-input').val(restrictTo); $('#add-typed-names').click(); setTimeout(function() { $('.permissions-update-button').click() }, 500); }, 500);Confluence doesn't expose an API to restrict draft pages, which is why you need to fake a user's interaction to set viewing permissions. The script opens the restrictions dialog, sets your defined restriction and closes it again.
-
Click Convert to bookmarklet.
-
Drag the provided link into your bookmark toolbar.
-
Now you can create a new blog post in Confluence and just click on your template bookmark (while editing).
Template added and viewing restrictions set.
Or, do it the easy way
If you don't want to get particularly hands-on you can use this bookmarklet-creating bookmarklet that I created.
-
Open the following page in a new tab
http://codepen.io/MartinMuzatko/full/peKOxp/
.
-
Once there, drag the Bookmarklet Generator button to your bookmarks toolbar.
-
Visit the Confluence page you want to turn into a template.
-
Open the page editor.
-
Click the bookmarklet you created in step one.
-
Drag the new bookmarklet into your browser's bookmark toolbar.
Mission Accomplished
No matter if you were hands-on or took the easy route, all you have to do now is:
-
create a blog post in Confluence
-
click on the bookmarklet link
Mission accomplished! Hopefully your colleagues will be just as thrilled as mine were.