Confluence is a collaboration tool built for teamwork without limits. Most of the work you do in Confluence benefits from being open by default: people can discover pages and add context, so the whole team can move faster. Still, some information should stay within a smaller circle. For example, an HR employee handbook might include a page on “How we work” (visible to everyone) and also a “Compensation and feedback” page (restricted to a few).
If you have Confluence Standard, Premium, or Enterprise, you can modify these settings through permissions and restrictions.
When to Restrict in Confluence (and When Not To)
Imagine you’re part of an HR team preparing your employee handbook for a global hiring initiative. While most of the space is open to all employees, some pages like salary reviews or policy drafts should only be visible to a few.
That’s where page restrictions help. With the Share menu, you can:
-
decide who can view or edit a page,
-
see a red padlock icon that signals a restricted page,
-
and adjust permissions anytime (e.g., switching someone from Editor to Viewer).

Restricted pages don’t show up in search results or the page tree for anyone excluded from that page.
But with great power, comes great responsibility, so don’t overdo it. Keeping work open by default is essential for effective teamwork. When information is accessible to everyone, it promotes transparency and encourages knowledge sharing across teams. This openness makes it easier for colleagues to discover relevant content, stay informed, and contribute their expertise.
As a result, teams can collaborate more efficiently, avoid duplicated efforts, and build a stronger, more connected company culture.
Confluence restrictions aren’t meant for every draft or in-progress document. For that, use page statuses or panels to signal to colleagues that your work isn’t ready yet.
Understanding Space and Global Permissions
Before we get into the best practices, let’s take a look at how permissions in Confluence are structured. Confluence offers three layers of access control:
Global Permissions
Global permissions are broad settings that apply across your entire Confluence site and are managed by Confluence administrators.
Global permissions dictate:
-
who can log in,
-
create user groups and add users to them,
-
who can create spaces,
-
who can become a Confluence admin.
Space Permissions
Every space in Confluence has its own independent set of permissions, managed by the space admins. These permissions control who can view, add, edit, export, or delete content within that space. However, users must also have the appropriate global permissions (set by Confluence admins) to access Confluence and its spaces.
There are two ways to manage space permissions:
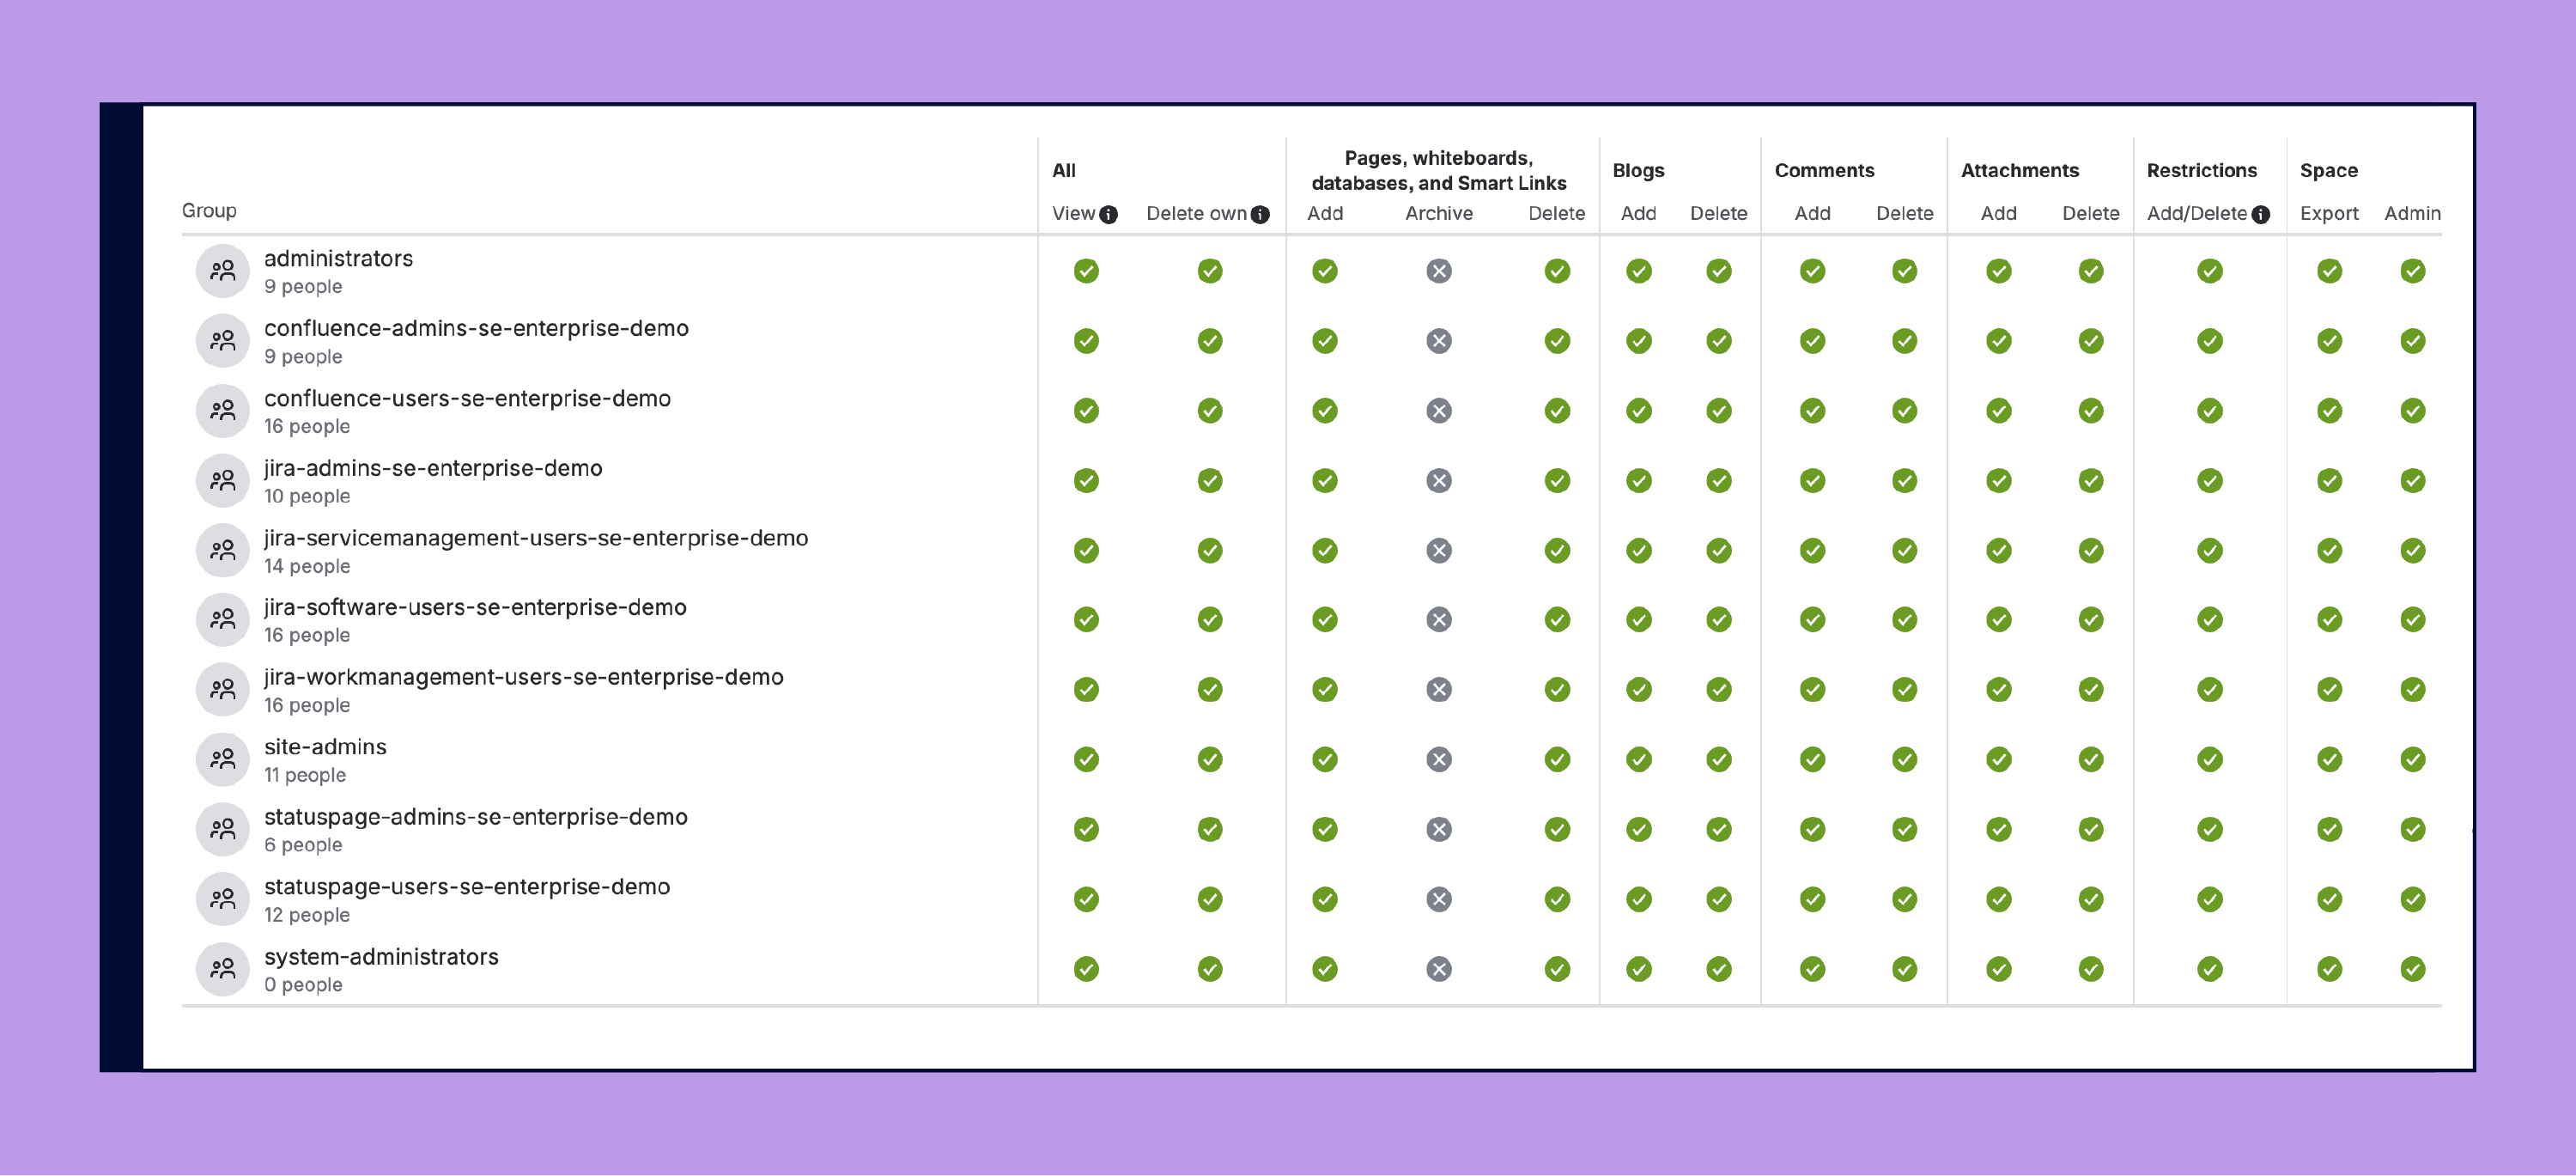
Classic, individual model
You can assign permissions to individual users, groups, or anonymous users. This gives you full control, but it often means clicking through dozens of checkboxes.
One thing to keep in mind: if a user belongs to multiple groups, the most permissive setting wins. For example, if you remove their ability to add content individually, but they’re part of a group that can add content, they’ll still be able to create pages.
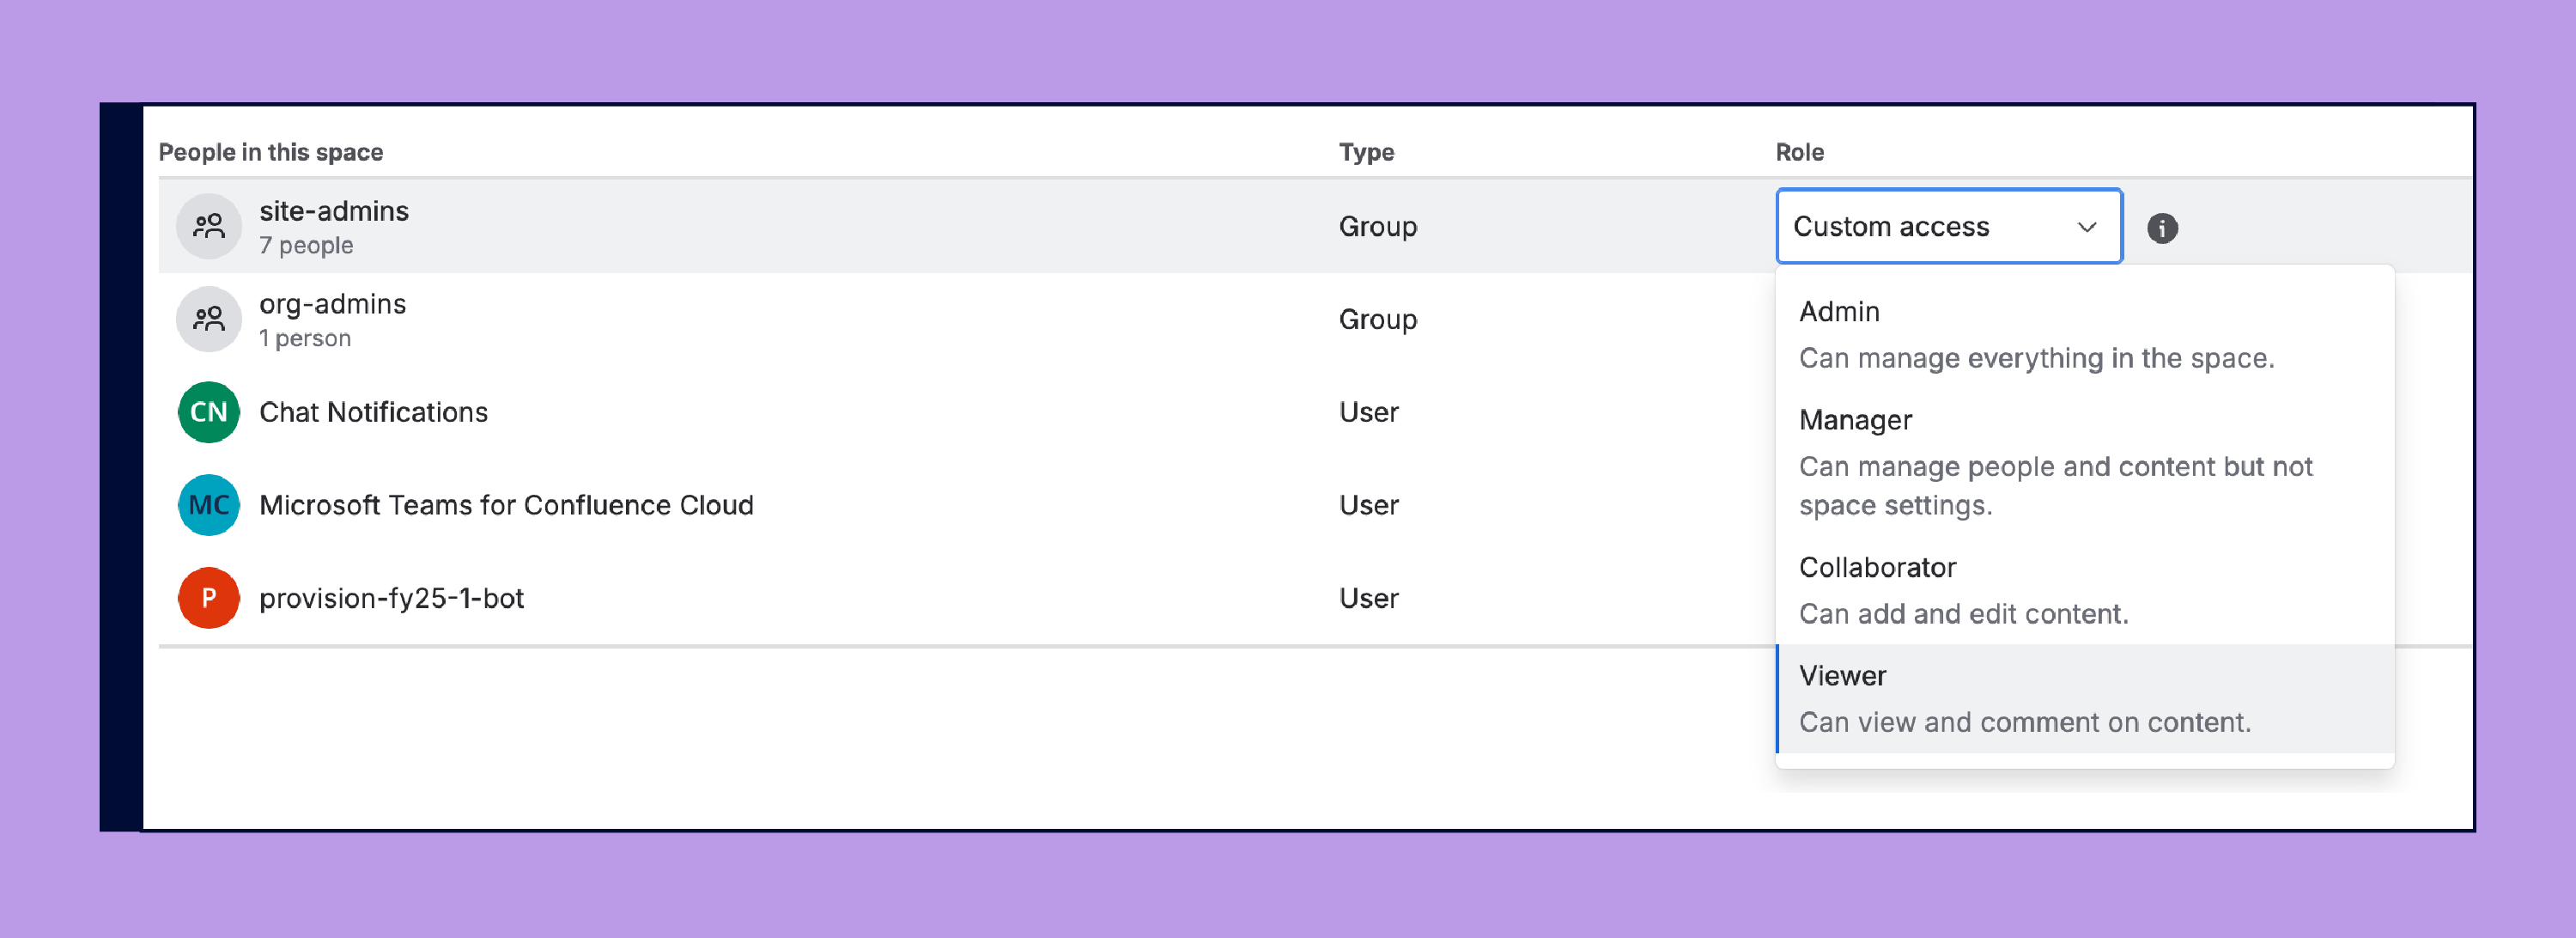
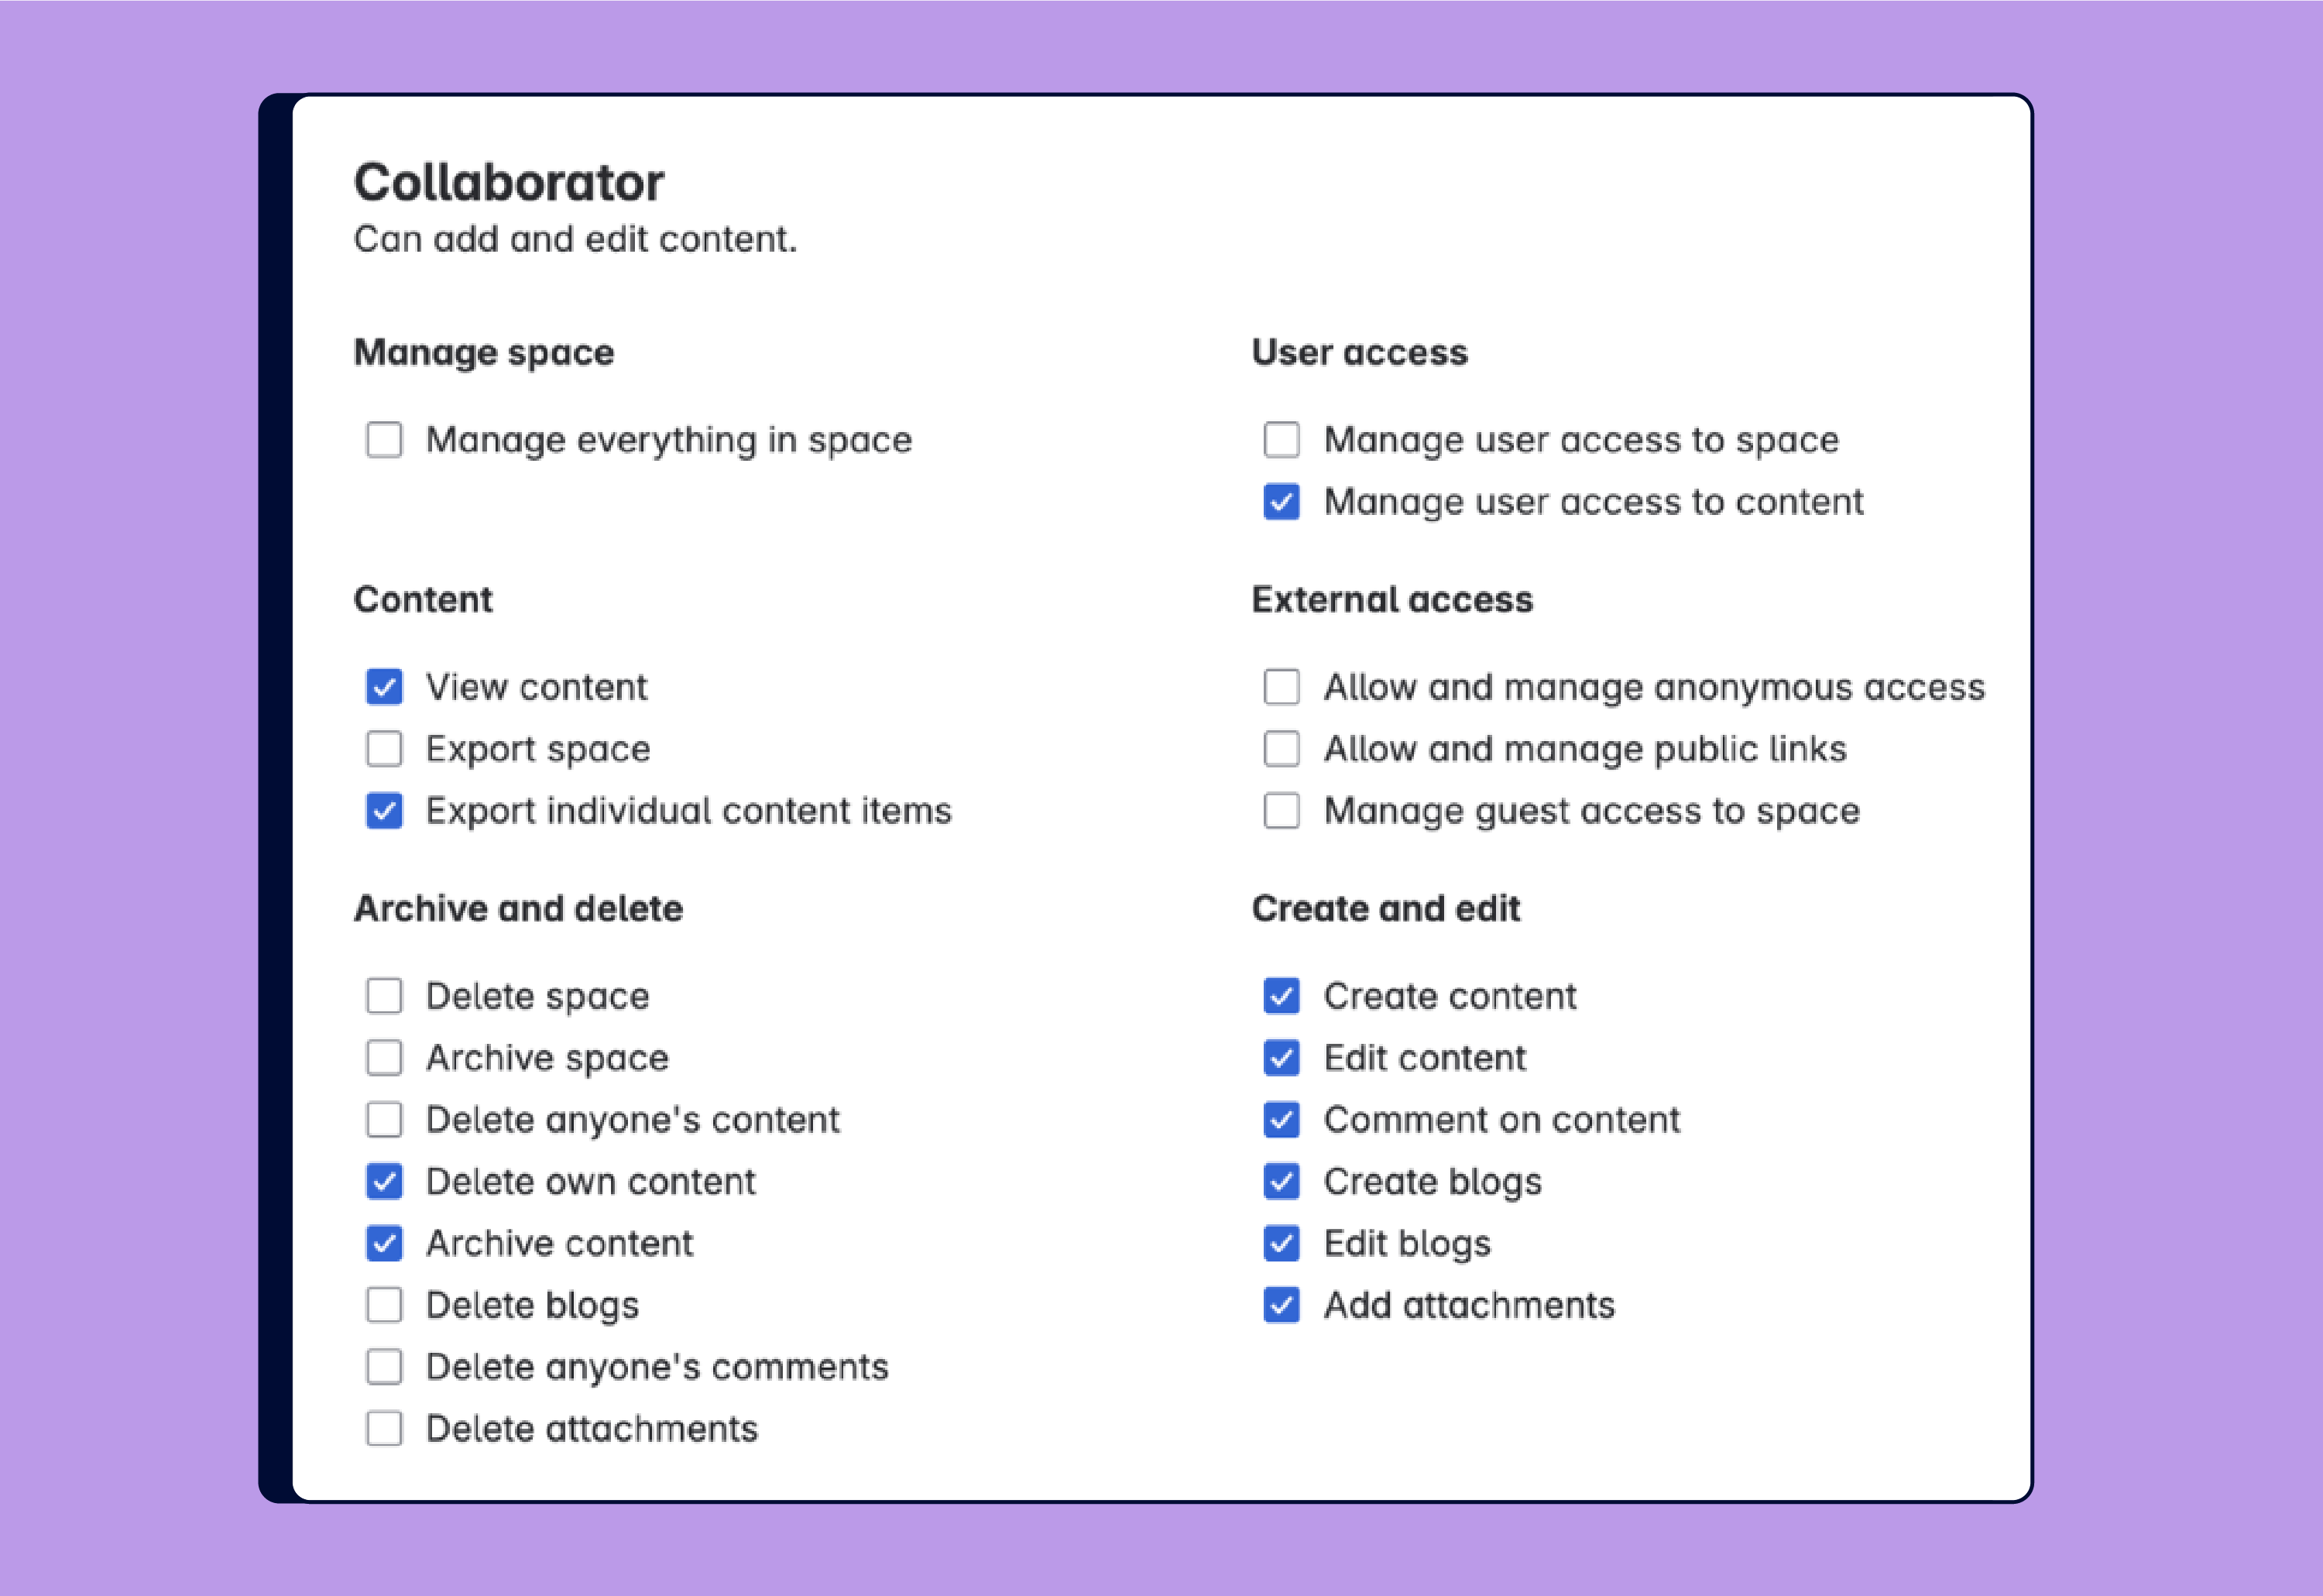
Using roles
Instead of using checkboxes, you can assign predefined roles like Admin, Manager, Collaborator, or Viewer. If you need something more specific, your Confluence admin can create up to 10 custom roles tailored to your organization’s needs.
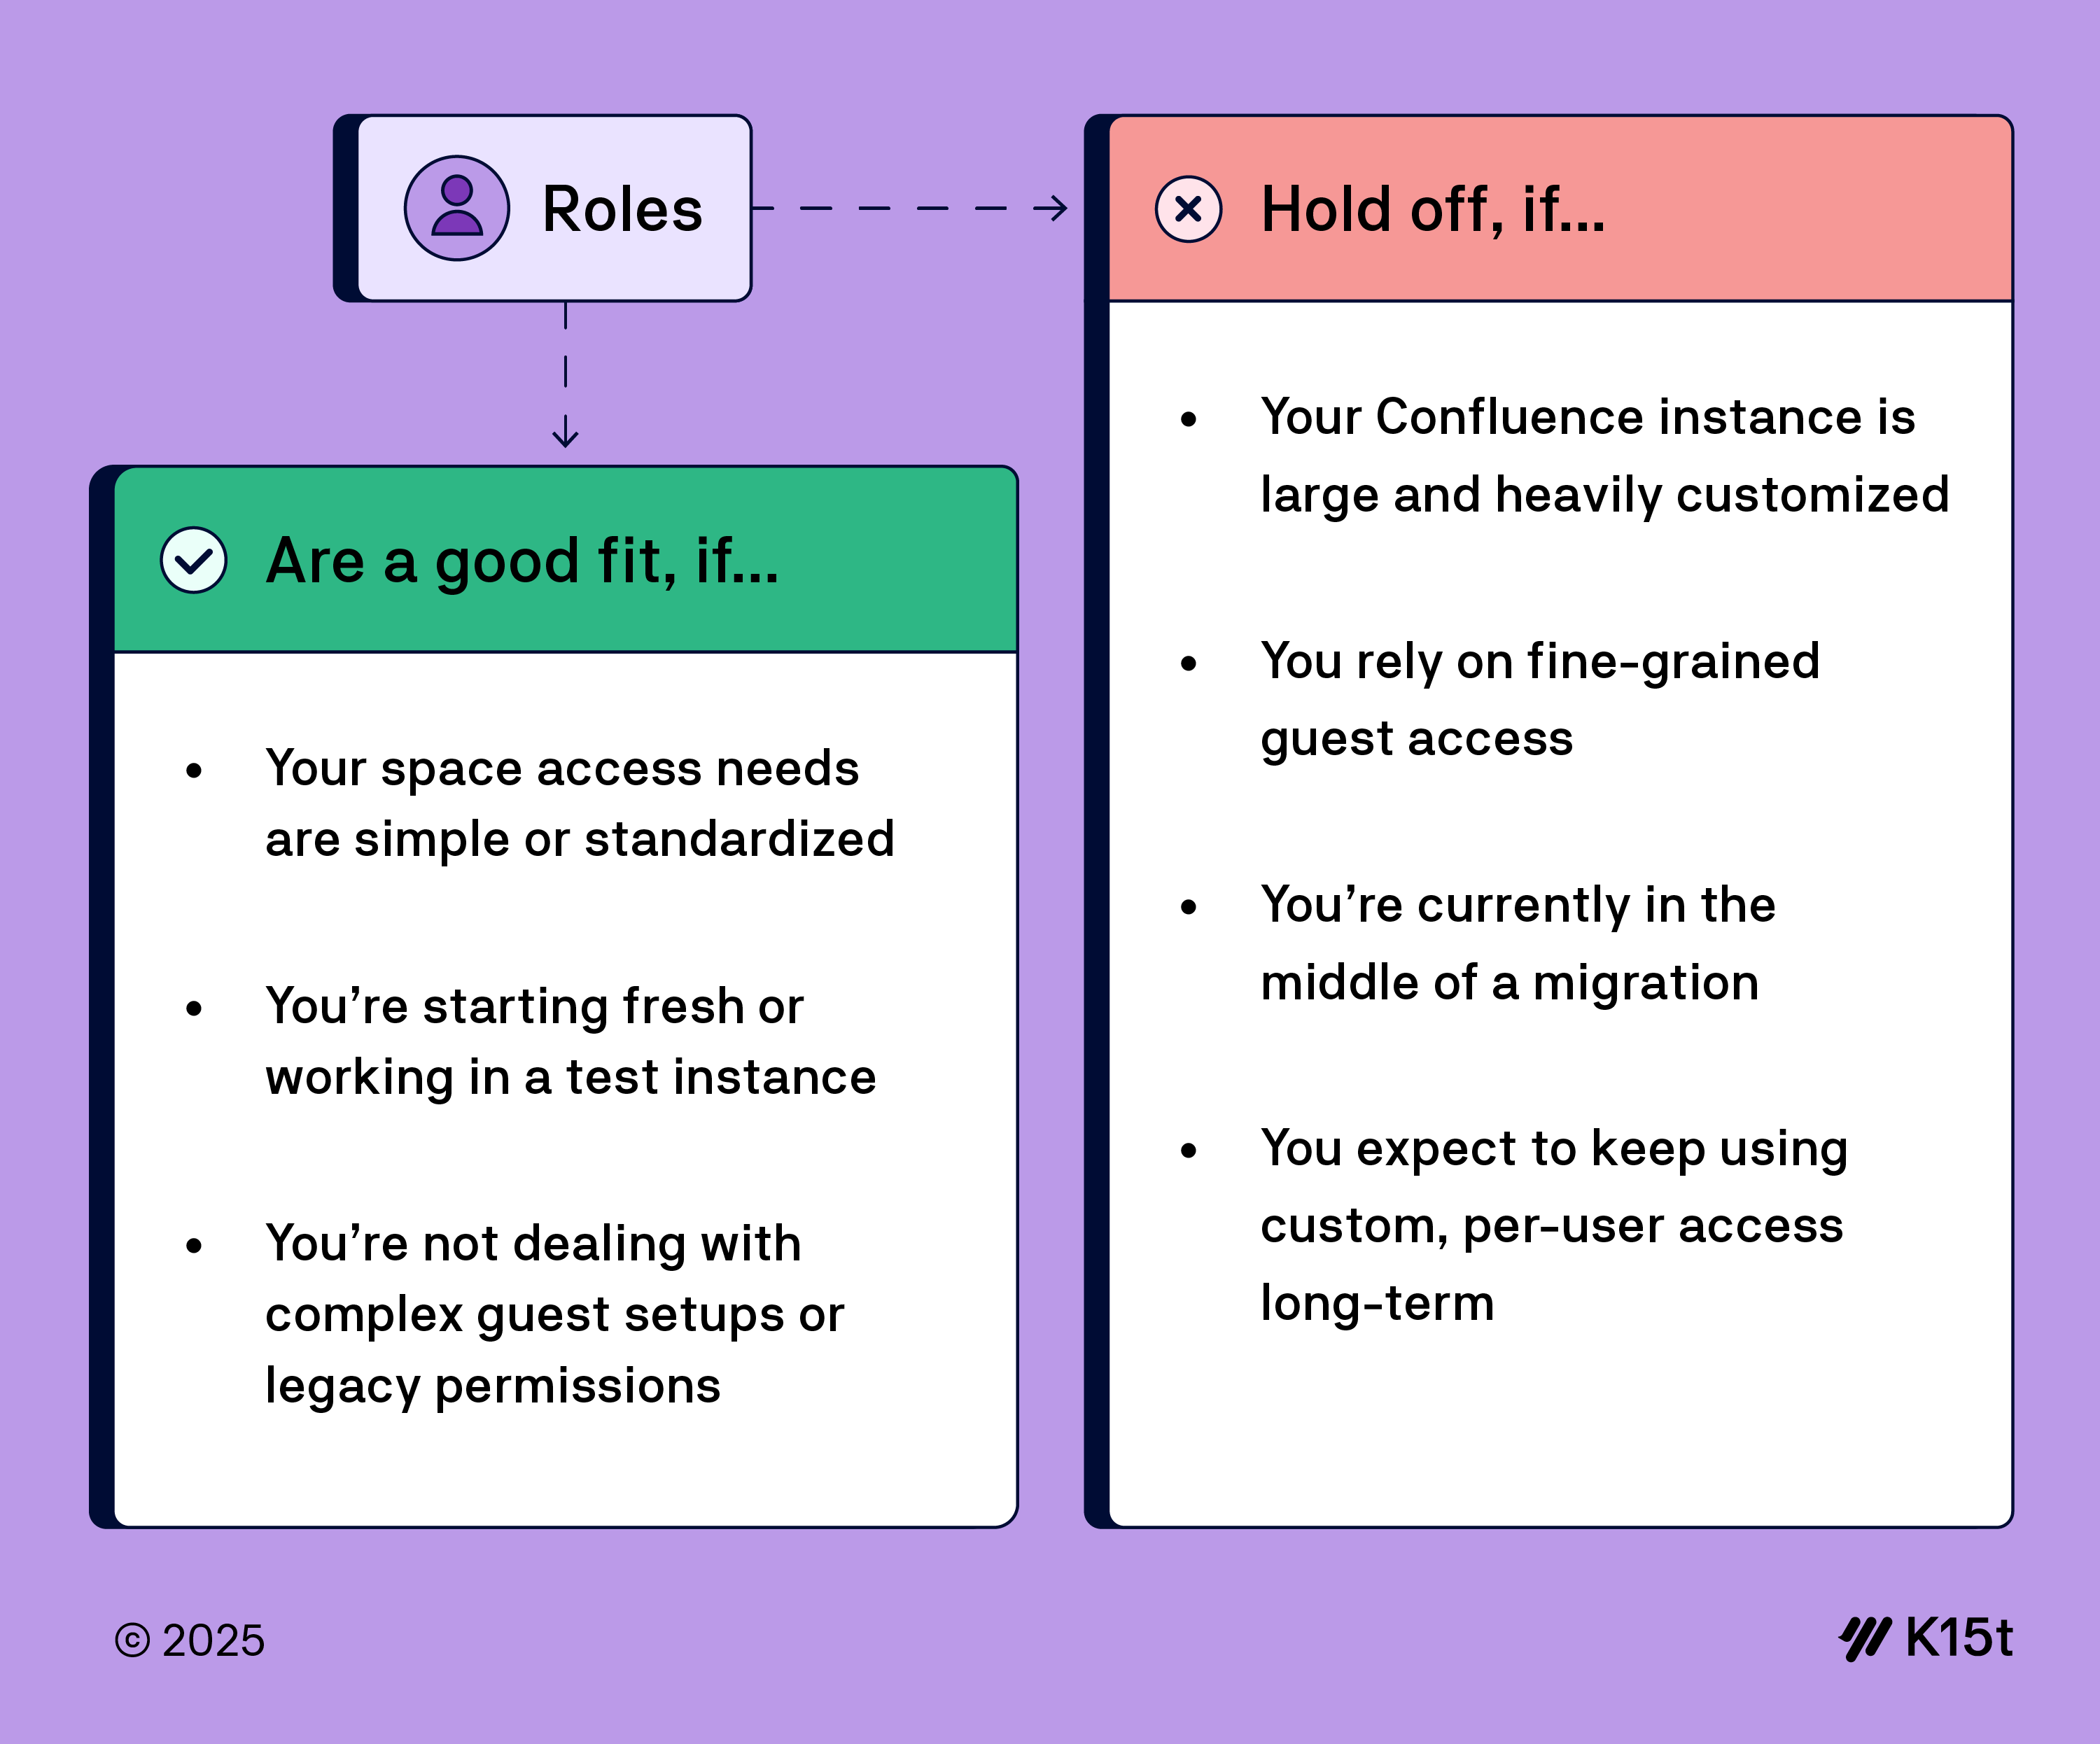
By default, Confluence works with the individual model, if you decide to switch a space to the role based permission system, you can’t reverse that decision. So it’s smart to test roles in a sandbox or a less critical space first, to see if they work for you.
You can also use our infographic as a guideline:
Admins can grant access to anonymous users too. What this means in practice is people outside your organization can view a page if the space admin grants them permission. You can make your space viewable by anonymous users through the space settings. Check out this video on The Best Way to Share Content Outside of Confluence for more information.
Content Restrictions
Some information in Confluence should only be visible to certain people.
For example, the employee handbook is in a space that everyone can see. But the HR team space also contains feedback pages about employees. These pages should only be visible to the people involved and the HR team. Everyone else cannot see these pages, but they can request access if needed.
If a restricted page has child pages, all child pages automatically inherit the same restrictions as their parent.
Using Roles in a Confluence Space
As part of an HR team, you may need the legal team to review contracts for a global hiring initiative. The legal team only needs to read and comment. When using standard roles in Confluence, the Viewer role would be enough. But in reality, the legal team also needs to make changes and sometimes create or remove content.
Simply making them “Collaborators” might be too broad, since that could also give them abilities you don’t want the legal team to have, like exporting sensitive data.
This is where custom roles come in. A Confluence admin can create a role tailored exactly to your needs. You could create a role for the legal team that allows them to add and delete content in the HR space but prevents them from exporting sensitive data.

The Goal: Knowledge Everywhere It’s Needed
Confluence is built for collaboration, and that works best when everyone can find what they need. Even if it doesn’t seem like someone in product design needs to know what marketing is up to, they might have helpful input, or just need the context. When content is easy to find, it’s easier to work together across teams.
But not everything should be open to everyone. Permissions and restrictions exist for a reason: they help your team feel safe sharing early drafts, sensitive info, or anything that isn’t quite ready for prime time. In fact, using restrictions can make collaboration easier, not harder.
In the end, it’s not just about access. It’s about helping people feel confident sharing what they know, and trusting others to do the same. That’s how we work better together. That’s how we make sure knowledge is shared everywhere it’s needed.
If you want to learn more about how permissions and open collaboration help new hires to thrive, take a look at our article: Why You Need to Onboard New Team Members into Confluence Quickly.
How does your team use permissions and restrictions? Do you lock down draft pages, or keep things open by default? Do you love the control, or find it tricky? Share your thoughts and tips in the comments. We’d love to hear how you handle it!
